A website is invaluable for expanding your online presence, whether running a personal blog or a business. It allows you to connect with a broader audience and serves as a platform to share your ideas, opinions, and skills, opening up possibilities for personal and professional projects. Let’s learn How to Create a Website with WordPress From Scratch Step-By-Step Guide for Beginners.

This article will guide you through transforming your website idea into a fully-functional online presence. You’ll learn how to select a suitable platform, acquire a web hosting plan, and choose a memorable domain name with the help of a web domain checker tool. We’ll also provide helpful tips on optimizing your website for better performance.
To illustrate the process, we will demonstrate how to create a professional website using two user-friendly platforms that do not require coding expertise. The first platform we’ll explore is WordPress, a widely-used content management system. The second option is Hostinger’s website builder, designed to simplify the website creation process.
Furthermore, we’ll provide valuable insights on post-publishing tasks and address commonly asked questions. By the conclusion of this article, you will have the knowledge and skills necessary to build your website, starting from scratch.
Table of Contents
3 Things to Do Before Creating a Website with WordPress
Before embarking on your website creation journey, it is crucial to grasp the significance of three fundamental elements: a website-building platform, web hosting, and a domain name.
Pick the Right Platform: CMS vs Website Builder

The two leading platforms for website creation are content management systems (CMSs) and website builders, each with distinct advantages.
Before making a final decision, conducting thorough research is essential. Opting for a platform that aligns best with your specific needs will significantly simplify the website-building process.
A CMS is computer software designed for creating, managing, and publishing website content. In this article, our focus will be on WordPress, a renowned CMS platform that powers over 42% of all websites on the internet.
On the other hand, a website builder is a program or tool that further streamlines website creation. Hostinger’s website builder is an excellent example, offering top-notch templates and a user-friendly drag-and-drop interface.
When selecting the ideal website-building platform for your requirements, consider the following factors:
- Technical knowledge: Some platforms require more advanced coding and technical skills. Evaluate your expertise to ensure a smoother web development experience.
- Cost: Find a platform that suits your budget and allows for future scalability if your website garners increased traffic.
- Support: Different types of websites may necessitate varying levels of assistance. For instance, a busy professional website may require immediate direct support for troubleshooting, while a small personal blog can rely on community support.
Get a Web Hosting Plan

Web hosting is a vital service that allows you to publish your website or web application on the internet. Before selecting a hosting plan, it’s important to determine the type of web host that best suits your needs. If you’re utilizing a platform like WordPress, exploring CMS web hosting options is advisable, as they provide optimized solutions tailored explicitly for CMS sites.
However, if you’ve opted for a website builder, you can proceed to the next section, as most builders come with their own hosting providers.
To find a suitable web host, consider the following elements while keeping your specific website in mind:
- Cost: Hosting prices vary, so ensure the chosen plan aligns with your budget.
- Features: Evaluate the bandwidth and storage capacity offered by the hosting provider to ensure it can support your website files and handle the desired number of visitors.
- Security: Check for built-in security measures, such as automated backups and SSL certificates, to safeguard your website and its data.
- Support: Different web hosting companies provide various support levels, from live chat to email assistance. Select a host that offers reliable 24/7 support.
Once you’ve found a suitable hosting provider, examine the available plans. The choice of a web hosting plan ultimately depends on the type of website you intend to build. For example, if you aim to create a WordPress eCommerce store, consider exploring Hostinger’s WooCommerce plans.
Additionally, keep the following features in mind:
- Free domain name: Some hosting companies, like Hostinger, offer plans that include a free domain name for the first year, reducing initial website costs.
- Suitable storage: Ensure sufficient storage capacity for all your files, images, and videos without compromising website speed.
- Great bandwidth: Opt for plans with unlimited bandwidth to handle high traffic volumes effectively.
Shared web hosting is recommended for beginners creating small- to medium-sized websites. Hostinger offers affordable website hosting options, including premium plans. For instance, our Premium Shared Hosting plan starts at $2.99/month and includes free domain name registration, unlimited bandwidth, and databases. Keep an eye out for Hostinger’s regular discounts on different hosting plans.
| Plan Features | Single $1.99/mo | Premium $2.99/mo | Business $3.99/mo |
|---|---|---|---|
| Websites | 1 | Unlimited | Unlimited |
| Email Accounts | 1 | 100 | 100 |
| Bandwidth | 100 GB | Unlimited | Unlimited |
| Free SSL | ✔ | ✔ | ✔ |
| Free Domain | ✘ | ✔ | ✔ |
| Allocated Resources | 1x | 2x | 4x |
Alternatively, VPS hosting provides access to a more secure and flexible server, albeit with a prerequisite of some technical knowledge. However, you can simplify the management of your VPS by installing a user-friendly control panel like Cyberpanel, powered by LiteSpeed.
At Hostinger, a range of VPS hosting plans is available, with prices ranging from $3.99/month to $77.99/month. Each plan includes a dedicated IP address and round-the-clock live chat support to address any concerns or issues that may arise.
In the case of large websites, such as online stores, cloud hosting presents an excellent solution in terms of reliability. For instance, Hostinger’s Cloud Startup plan, priced at $9.99/month, offers industry-standard data protection, a free content delivery network (CDN), and daily backups to ensure the utmost security and performance.
Choose a Memorable Domain Name
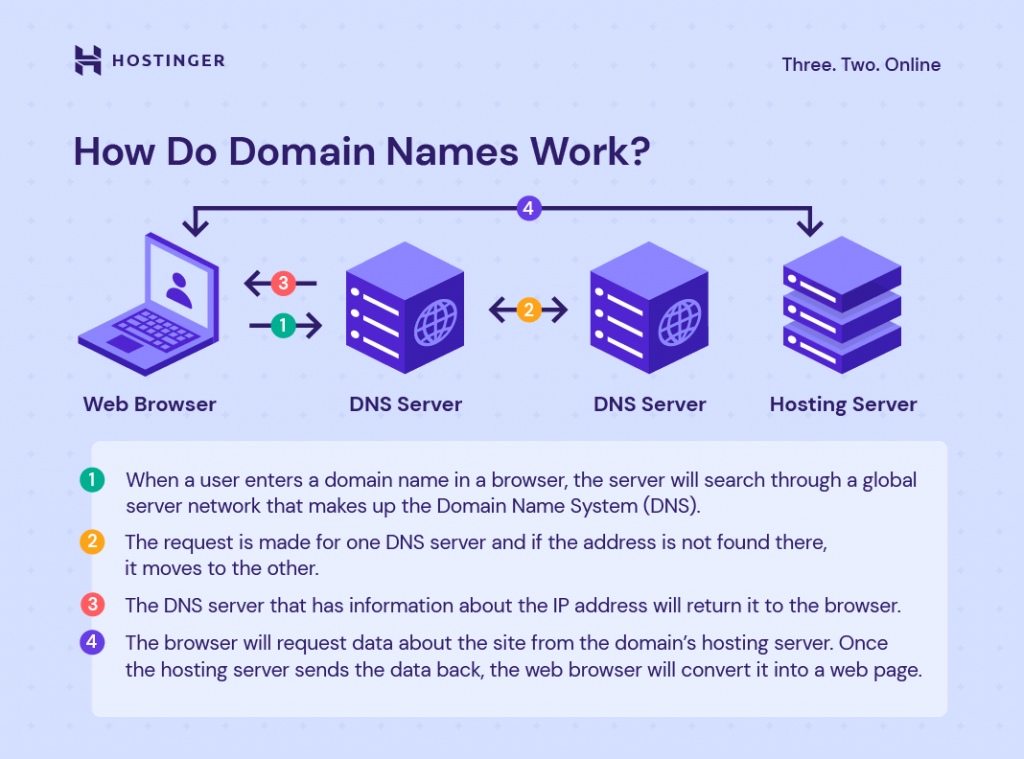
Lastly, it’s time to select a domain name for your website. A custom domain name is crucial for helping visitors locate your website and plays a significant role in branding. A memorable domain name can even contribute to driving organic traffic to your site.
To find the perfect domain name for your website, consider the following factors:
- Recognition: Opt for a domain name that is short and clear, minimizing the chances of visitors misspelling it. Using familiar words or phrases will make it easier for visitors to remember your domain.
- Availability: Utilize a web domain checker to determine if your desired domain name is available. You can modify the extension or explore alternative domain name options if it’s already taken.
- Cost: Remember that top-level domains (TLDs) come with varying price tags. Choose a domain that fits within your budget. Hostinger, for instance, offers domains ranging from $0.99 to $12.99 per year.
Once you’ve settled on a domain name, it’s time to register it with a reliable domain name registrar. Many website builders and hosting providers offer domain name registration services as part of their pricing plans. However, further research is required if you wish to have your own domain name.
To register a domain on your own, begin by searching for an Internet Corporation for Assigned Names and Numbers (ICANN) accredited registrar. Different registrars provide their own array of services, prices, and packages.
Choosing a trustworthy registrar is vital, as they will securely store all the relevant information associated with your domain. Additionally, the domain registrar has the authority to modify your data within the domain database.
How to Make a Website With a Website Builder

Ideal for: Beginners with no web development experience
Key features: Hosting included, no-code interface, ready-made templates, visual builder
Website examples: Portfolio, resume, event website, blog, business website, eCommerce store
Once you have set up your platform and hosting and acquired your domain, creating your own website is time.
Using a website builder makes the process exceptionally straightforward, even for those without web development experience. Hostinger’s website builder, for instance, offers a user-friendly interface that allows you to effortlessly create your desired content and layout. Some of the notable benefits of Hostinger’s website builder include the following:
- Cloud hosting: Enjoy the more reliable performance with minimal downtime, ensuring your website stays accessible to visitors.
- Security: The website builder adheres to PCI standards, safeguarding visitors’ private information and ensuring a secure browsing experience.
- Artificial Intelligence (AI) tools: Leverage AI-powered tools that assist with branding, marketing, and optimizing your website for improved performance.
- Fast setup: The intuitive interface facilitates seamless editing and content creation, enabling swift progress.
Hostinger’s website builder excels in visual-oriented websites such as online portfolios, photography blogs, and media-focused websites. Here are the steps to utilize this website builder effectively:
- Select an appropriate template that aligns with your site’s purpose.
- Craft your main home page, setting the tone and showcasing your content effectively.
- Customize the remaining pages to suit your preferences and provide a cohesive browsing experience.
- Optimize the navigation structure, ensuring easy navigation and a user-friendly interface.
- Enhance your website by adding compelling visuals such as images and videos, enhancing engagement.
- Save and publish your site, making it accessible to the world.
1. Pick a Template
Selecting a template is a crucial initial step as it determines the visual presentation of your website’s content. To begin, opt for the Hostinger Website Builder as your preferred website platform within your hosting panel.

After selecting the Hostinger website builder and indicating the domain that should be associated with your website, you will be redirected to the template library.

Browse through a range of meticulously crafted templates and choose your favorite. These templates are thoughtfully categorized into various sections such as eCommerce, Services, Photography, Restaurants, Portfolio, Resume, Events, and Landing Pages. Alternatively, you can opt for a blank website template if you prefer a more customized approach.
To aid in your decision-making process, hover over the template of interest and click on Preview to witness it, providing a better understanding of its appearance and functionality.

Upon selecting your desired template, click the “Start Building” button to begin the website creation process. If you wish to return to the template library at any point, click “All templates” to navigate back.
To customize the visual style of your website, access the “Website styles” icon on the left-hand side. From there, you can personalize aspects such as Colors, Text, and Buttons to align with your desired design preferences.

Utilize the intuitive drag-and-drop tool to effortlessly modify the layout of your page. Click on an element and relocate it to your desired area.
To evaluate the design and navigation of your website, click on the Preview option. Additionally, ensure optimal mobile responsiveness by selecting the mobile icon on the top menu bar. Customize the mobile design directly on the web page, allowing you to make necessary adjustments and refinements.
2. Create the Main Page
Crafting an informative and visually captivating homepage is crucial as it serves as the initial point of contact for website visitors. By optimizing this main page, you can encourage visitors to explore further and prolong their stay on your site.
A well-designed homepage has the potential to drive visitors towards desired actions, such as completing a purchase or scheduling an appointment. When creating your main page, consider the following elements:
- SEO: Incorporate meta titles and descriptions to enhance your website’s visibility on search engine result pages (SERPs) and attract more organic traffic.
- Media: Enhance the visual appeal by incorporating high-quality images or videos that captivate and engage visitors.
- Menu: Display a clear and comprehensive menu that showcases different web pages, such as the About and Contact pages, inviting visitors to delve deeper and learn more about your offerings.
- Layout: Strategically position important information to ensure it captures visitors’ attention immediately. For instance, place a prominent call-to-action in a central location to prompt desired actions.
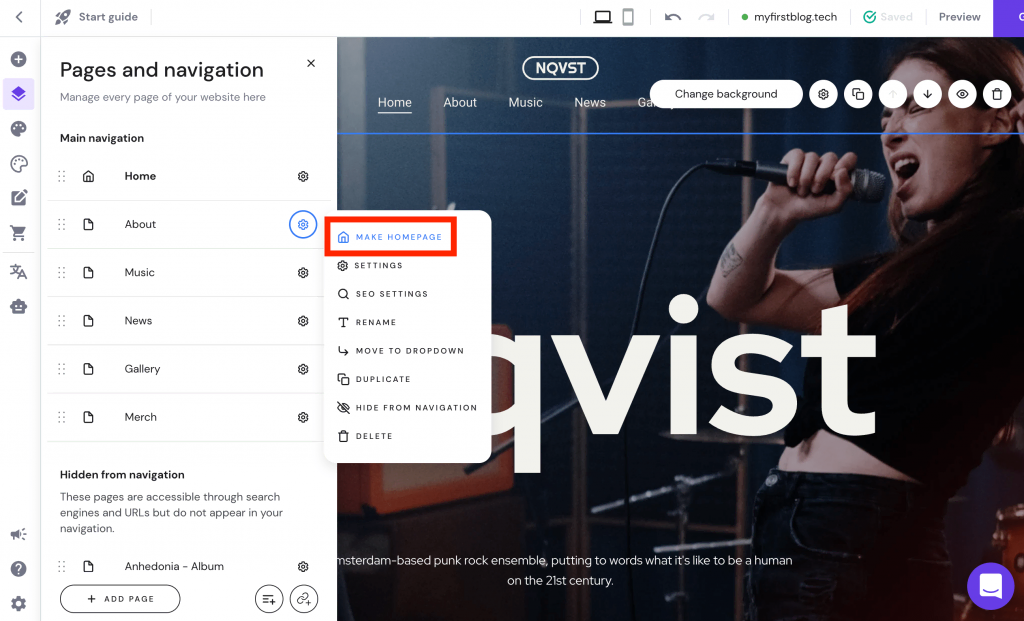
With Hostinger, each theme includes a homepage. You can customize the theme’s existing homepage or create a new page as your main homepage. To accomplish this, follow these steps:
- Click on the “Pages and navigation” icon located in the upper left corner.
- Select the desired page you wish to designate as the homepage.
- Click on the gear icon and choose “Make Homepage” to set the selected page as your main homepage.
3. Add More Pages and Sections
While Hostinger’s themes offer default pages and sections, personalizing your website by creating custom pages adds authenticity. If you’re building a one-page website, you can add new blank areas or utilize pre-designed sections.
For multi-page websites, commonly included pages are About Us, Blog, and Contact pages, providing additional information to visitors. When incorporating more pages, consider the following:
- Featured pages: Decide which pages to include in the main menu for easy navigation.
- Page hierarchy: Establish a clear page hierarchy by organizing main pages and subpages, aiding search engines in crawling your website more effectively.
- Trends: Explore other websites to identify pages that attract visitors and align with current trends.
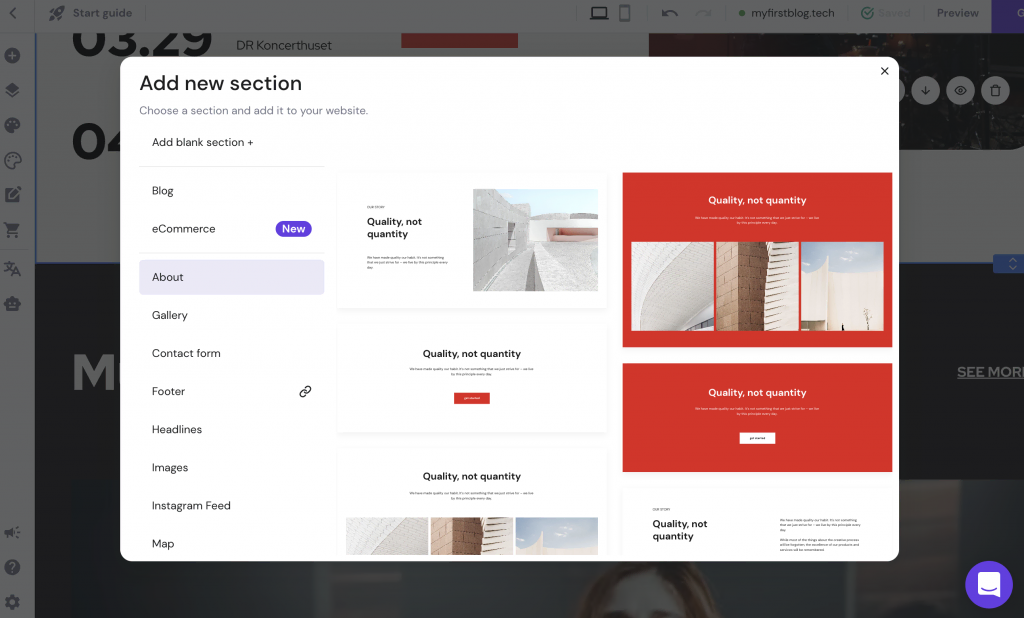
To manage your pages, including deleting or reordering them, navigate to the Pages and navigation settings. To add a new page, follow these steps:
- Under Pages and Navigation, click on the “Add Page” button.
- Choose a layout from the theme options or opt for a blank page. Select the “Add blank page” option to design your layout.
- If you’ve chosen to Add a blank page, select the elements you want to incorporate, such as Text, Button, Image, Video, Instagram Feed, or Contact Form.

- In addition to individual elements, sections are vital in effectively organizing and dividing your web page. When you click “Add Section” in the website builder, you can add a blank section or select a pre-made one. The sections are categorized based on purpose, such as “About” and “Headlines.”
- Once you’ve completed designing the page, navigate to the “Pages and Navigation” section to optimize it further. Click on the gear icon next to your newly created page and select “Page Settings.”
- In the “General” settings, you can modify the “Name in navigation” and “Page URL” to accurately describe the content of the page. This will help visitors understand its purpose. Moving on to the “SEO” settings, you can add a compelling “Page title” and a concise “Page description” to entice visitors to click on your site when it appears in search engine results. Don’t forget to save your changes by clicking the “Save” button to finalize the process.
4. Optimize Your Site’s Navigational Structure
To ensure a seamless user experience on your website, it’s crucial to consider navigation. Visitors should be able to effortlessly browse and locate the information they need.
To enhance navigation and user experience, follow these best practices:
- Streamline your menu: Limit the menu items to around seven on your main menu. This prevents confusion and overcrowding, making it easier for visitors to find what they’re looking for.
- Analyze user responses: Keep an eye on page visits and engagement metrics. If a particular page receives little traffic, consider moving its content to a more prominent page and removing it from the main menu.
- Optimize for mobile devices: Remember that menus may appear differently. Ensure that your menu remains user-friendly and easy to navigate on smaller screens.
In addition to menu organization, the placement of the menu on your web page plays a significant role in user navigation. Customizing your header and footer can further aid visitors in efficiently browsing through your web pages. By strategically designing these sections, you can provide intuitive access to critical areas of your website, contributing to a positive user experience.
Header
To create an easily navigable and visually appealing header at the top of your web page, follow these steps:
Access the drag-and-drop editor and navigate to the menu section. Click on the gear icon to customize the header.
In the Header settings, make the following adjustments:
- Layout: Choose whether to make the header sticky, which keeps it fixed at the top of the web page even as visitors scroll. Additionally, modify the Menu position, Item spacing, and Padding to your liking.
- Logo: Decide whether you want to include a logo in your header. Adjust the Logo width, position, and Menu item spacing.
- Shopping bag: If you have an online store, consider including the shopping bag icon in your header.
- Style: Customize the Header background by selecting a solid color or adding an image. You can also modify the Website, Header text, and Hover colors to match your branding and design preferences.
Footer
Similarly, a well-crafted footer entices visitors to explore your website further. To achieve this, include navigation links and essential information at the bottom of your web pages. Most footers typically contain contact details, social media icons, copyright notices, and links to other relevant pages.
The footer serves as a clear indication that the user has reached the end of the page. The links within the footer often lead to content-rich pages. For instance, online stores commonly include links to terms and conditions and refund policies.
Your chosen theme will automatically generate a footer, which you can customize as needed. To modify the pre-existing elements, click on the desired part and select the Edit button above it.
To further personalize the footer, click on the footer section and choose the gear icon.
A grid layout will be presented, aiding you in rearranging the elements within the footer section. Meanwhile, the Section settings provide options for making the following changes:
- Layout: Enable Snap to guides to facilitate easier management of elements within the footer.
- Background: Choose between using an image or a solid color as the background for the footer.
- Anchor: Create a unique URL specifically for the footer, enhancing the browsing experience for your visitors.
5. Enhance Your Website With Visual Elements
Incorporating visual elements such as images, videos, logos, and favicons can captivate visitors and encourage them to delve deeper into your website. In fact, pages with videos experience 88% more engagement from visitors, as videos effectively convey the essence of your website and capture their attention.
However, ensuring that the visual elements you choose are relevant to your website’s purpose is crucial. More than irrelevant visuals can only serve as distractions and confuse visitors. With the website builder’s intuitive drag-and-drop editor, customizing the layout of your visual elements becomes a seamless process.
To effortlessly add any visual element to your website, click the “Add element” button in the editor’s top left corner. This grants you access to a wide range of options, enabling you to enhance your site’s Appearance and engage your audience effectively.
Images
To incorporate an image into your web page, click “Add elements” and select the “Image” option. Drag and position the image element onto the desired area of your web page.
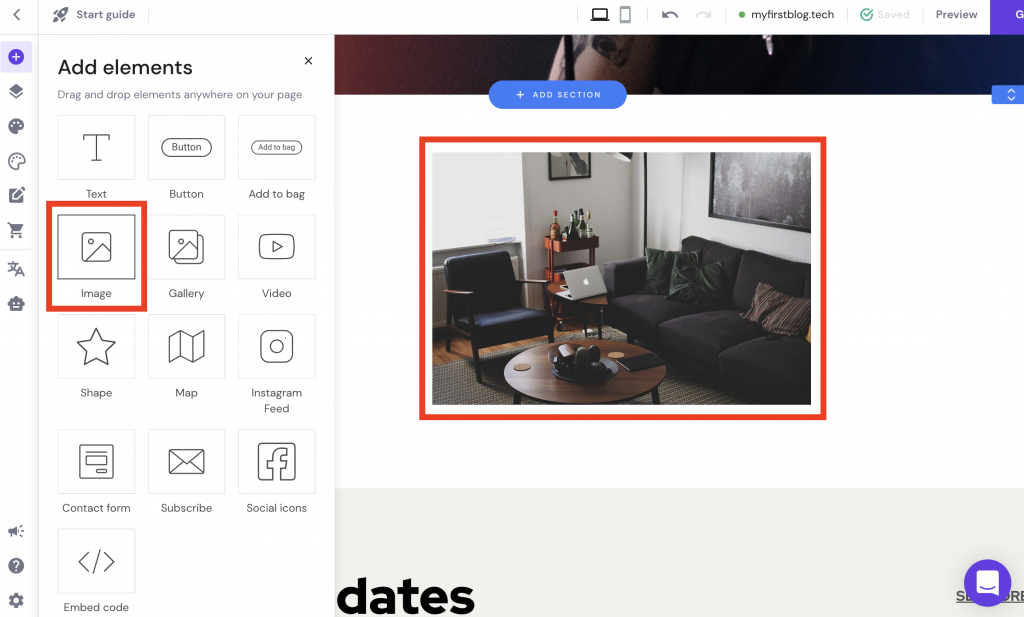
By default, the builder will display a placeholder image. Click on the image and select “Change image” to access the Image settings.
To replace the default image, click the “Replace Image” button. You have the option to upload your own picture or choose from Hostinger’s extensive library of free-to-use stock images, which boasts over a million photos. Remember to provide a descriptive Alt text for the image in the Image settings.
Next, under the “Action” section, determine the behavior when visitors interact with the image:
- “Nothing“: No specific action will occur when visitors click on the image.
- “Open full-screen preview”: Clicking the image will display it in full size.
- “Open link”: Clicking the image will redirect visitors to a previously added link. Additionally, you can choose to open the link in a new tab or redirect the entire page.
Gallery
To incorporate multiple images into your web page, select the “Gallery” element and drag it onto the desired location.
Initially, Hostinger will populate the gallery with default images. To customize the gallery, click on the element and choose “Manage gallery.”
To include your own images, click on “Add Images” and select the desired images from your files. If there are default images in the gallery, you can remove them by selecting them and clicking the trash icon.
After adding your images, click on the gallery element once again and click on the gear icon. This will open the Gallery settings.
In the Gallery settings, you can make adjustments such as changing the layout, specifying the number of items per row, adjusting the gap between photos, and setting the action when visitors click on an image.

Video
To add videos to your website using Hostinger, you must upload the video to YouTube or Vimeo beforehand.
Once you’ve placed the Video element on your web page, click on it and select “Edit the video.”
In the Video settings, replace the Video link with the URL of your video. You can choose whether the video should play automatically when visitors access the page. Note that the Autoplay feature may not work on mobile devices.
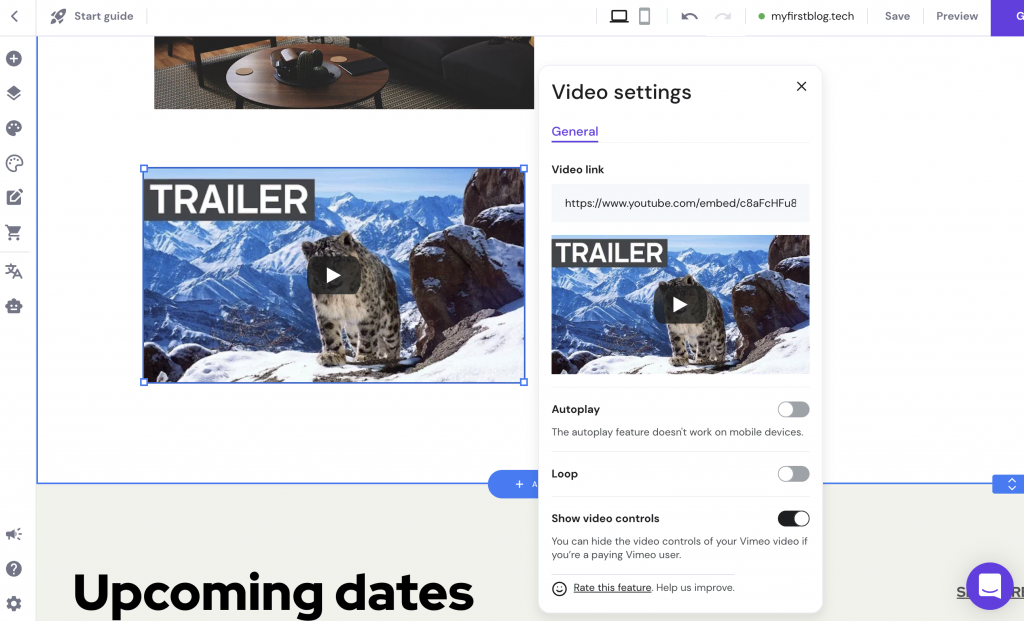
You also have the option to enable Loop, which will make the video repeat continuously. Regarding layout, you can adjust the Padding between the video and other elements on the page. If you prefer a less distracting experience for your visitors, you can disable the Show video controls option, which will hide the play, pause, and volume buttons.
Logo
A logo on your website can be advantageous, whether running an online business or maintaining a personal website. It not only adds credibility but also contributes to building a professional brand.
If you still need to design a logo for your website, Hostinger offers an AI Logo Maker tool to assist you.
To create a new logo, navigate to the AI tools section and choose the Logo Maker option.
Next, you’ll have the option to select how you’d like to create your logo:
- Please create a logo yourself: Enter your desired logo name, specify the purpose of your logo, and indicate where you intend to use it. You can choose a logo from the available options and customize its colors, shapes, and layout according to your preferences.
- Use a logo generator: Browse through a gallery of pre-designed logos and choose the one that best aligns with your vision. You can further personalize the logo by selecting suitable colors and shapes.
Pro Tip
When creating or uploading a logo, it’s recommended to have a transparent background. This allows your logo to seamlessly adapt to different color schemes and backgrounds you may choose for your website.
Favicon
In the meantime, favicons serve as visual representations of your website on web browsers’ tabs, making your site more memorable, professional, and trustworthy to visitors.
To upload a favicon to your website, navigate to the Website settings located in the bottom left corner of your editor. From there, select General Settings to proceed.

Click the Add Image button in the Favicon section to upload your customized favicon. Once you’ve chosen the desired image, click Save Changes to complete the process.
6. Save and Publish Your Website
Hostinger automatically saves all your modifications, eliminating the concern of losing unsaved edits. However, after customizing the content, reviewing each web page and its associated links is always a good practice. When you feel confident and ready to make your website live, click the Publish button in the top right corner.
How to Make a Website With WordPress

Ideal for: users with varying expertise levels, ranging from novices in web development to seasoned web designers.
Key features: Open-source nature, an extensive selection of third-party plugins and themes, thriving community support.
Website examples: blogs, portfolios, business websites, eCommerce stores, and community forums.
WordPress, known for its adaptability and scalability, caters to diverse website needs. Its vast collection of plugins empowers you to expand your site’s functionality as it grows in popularity.
Follow the comprehensive WordPress tutorial below to craft a brand-new website using this platform. The steps are straightforward:
- Install WordPress: Utilize your hosting dashboard, manual installation, or local setup to install WordPress.
- Choose a suitable theme: Select a theme that aligns with your site’s purpose and aesthetic.
- Install essential plugins: Enhance your site’s capabilities by installing necessary plugins.
- Create web pages: Build your desired pages to showcase your content effectively.
- Incorporate a navigation menu: Help visitors explore your site by adding a user-friendly menu.
- Optimize for search engines: Improve your site’s visibility by implementing SEO techniques.
- Integrate additional functionality: Tailor your site further by incorporating extra features.
- Publish your website: Make your website live and accessible to your target audience.
1. Install WordPress
WordPress, an acclaimed CMS, offers the advantage of being both free and open-source. You have three primary methods to install WordPress:
- Auto-installer: Opt for web hosting services, like our WordPress plans, that provide an auto-installer feature within their control panel. This user-friendly option is particularly suitable for beginners, streamlining the installation process.
- Manual installation: Take charge of your WordPress installation by creating a database and following the step-by-step instructions. Although this method requires more time and effort, the process remains straightforward.
- Local installation: Install WordPress changes offline by installing them on your computer. Obtain the latest WordPress version and utilize tools like MAMP for macOS or WampServer for Windows to establish a local WordPress environment.
2. Choose a WordPress Theme
Website design plays a crucial role in attracting visitors and enhancing user experience. While hiring a web designer can be expensive, WordPress provides a user-friendly interface that empowers users to design their websites.
With over 8,800 free and premium themes in the official WordPress themes repository, you have a wide range of design options. Some themes cater to various website types, while others focus on specific purposes:
- eCommerce: Themes like Divi and GeneratePress prioritize user experience, seamless product pages, and secure payment gateways, making them ideal for online stores.
- Blogging: SEO-friendly designs with excellent navigation are essential for blogs. Themes like Astra and OceanWP are popular for improving your site’s design.
- Portfolio: If you want to showcase your previous projects, opt for a portfolio theme that emphasizes your work without being visually distracting. Clean Portfolio and Air are examples of simple WordPress themes suitable for portfolios.
Premium themes typically cost around $50 for a one-time purchase. Starting with a free WordPress theme is an option, and you can upgrade to a premium theme as your site grows. Premium themes often provide additional tools and features to optimize your WordPress site.
To install a theme, follow these steps in your WordPress admin panel:
- Go to Dashboard → Appearance → Themes and select a theme for your site. Click the “Add New Theme” button to explore the complete theme gallery.

- Browse through the gallery and click “Details & Preview” or the “Preview” button to see how the theme looks on a website.
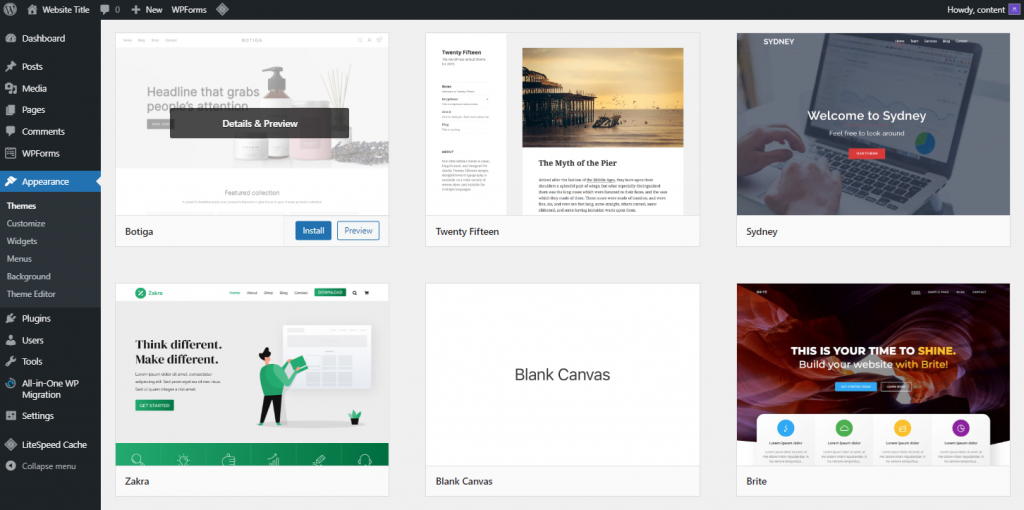
- To use the selected theme, click “Install” → “Activate.” If you want to return to the gallery, click the X icon in the top left corner.
- Click on the “Customize” button to personalize the theme’s design.

- Customize the layout, colors, and fonts to suit your preferences.

- Use the tablet or mobile icons at the bottom left corner to preview how the theme appears on smaller screens.
To install a premium theme, you must manually upload its files after purchasing. Follow these steps:
- Go to Dashboard → Appearance → Themes → Add New Theme.
- Click on the “Upload Theme” button.
- Select the .zip file of the premium theme you purchased.
- Once the file is uploaded, click the “Activate” button to activate the theme.

3. Install WordPress Plugins
The WordPress platform offers a wide range of plugins, making it a valuable tool for website development. A WordPress plugin is a software component that enhances the functionality of a WordPress site. With thousands of free and premium plugins available, users can customize their websites without the need for coding expertise.
With over 59,000 plugins, WordPress caters to various needs and purposes. These plugins offer numerous benefits, including:
- Enhanced Usability: Plugins optimize website navigation, making it easier for users to browse web pages and find the necessary information.
- Additional Tools: Plugins expand the capabilities of a website by adding features such as social media buttons or improving search engine optimization (SEO) to attract more visitors.
- Improved Performance: Plugins enhance website speed, security, and user management, improving overall user experience.
To install a WordPress plugin, follow these steps:
- Go to your WordPress Dashboard and navigate to Plugins → Add New.
- Browse through the plugin gallery or use the search box to find a specific plugin by name.
- Once you’ve found the desired plugin, click on the Install Now button.
- After the installation, click the Activate button to activate the plugin and make it functional on your website.
If you have purchased a premium plugin, you will need to upload it manually. Here’s how:
- Download the premium plugin files from the source where you made the purchase.
- Go to your WordPress Dashboard and navigate to Plugins → Add New.
- Click on the Upload Plugin button.
- Choose the plugin’s .zip file you downloaded and click the Install Now button.
- Once the installation is complete, click the Activate button to activate the premium plugin on your website.

Here are a few top-notch plugins that can optimize your WordPress website:
- Contact Form 7: This plugin allows you to create customized contact forms for your web pages. It offers flexibility in design and functionality, making it easy for visitors to contact you.
- WooCommerce: If you want to add product pages and payment gateways to your website, WooCommerce is the perfect plugin. It suits all websites, enabling you to create an online shop effortlessly.
- Akismet: With Akismet, you can keep your website safe from spam. This plugin checks comments and contact form submissions for potentially malicious content, ensuring a clean and secure environment for your site.
4. Build Your First WordPress Page
You can create a single or multiple pages when constructing a website. If you choose the latter, it’s recommended to include the following essential pages:
- Homepage: The initial page visitors encounter when they land on your site. A captivating homepage should prioritize speed, compelling content, and an attractive design to instantly captivate the audience’s attention.
- About page: This page provides additional information about your website, whether it represents a business or a personal venture. It allows you to share details about your background, mission, and other relevant information that helps visitors understand your website’s purpose.
- Contact page: A dedicated page that enables visitors to quickly reach out to you for further inquiries, feedback, or business-related matters. It should include contact information such as email address, phone number, and a contact form for convenience.
- Blog page: A space where you can regularly publish new content, such as articles, updates, or news related to your website’s topic or industry. A blog keeps your site fresh, engaging and provides an opportunity for interaction with your audience through comments and discussions.
- Product or service page: If you’re running an eCommerce store or offering specific products or services, it’s essential to have a separate page dedicated to showcasing and describing what you offer. This page allows visitors to browse and make informed decisions regarding their purchases.
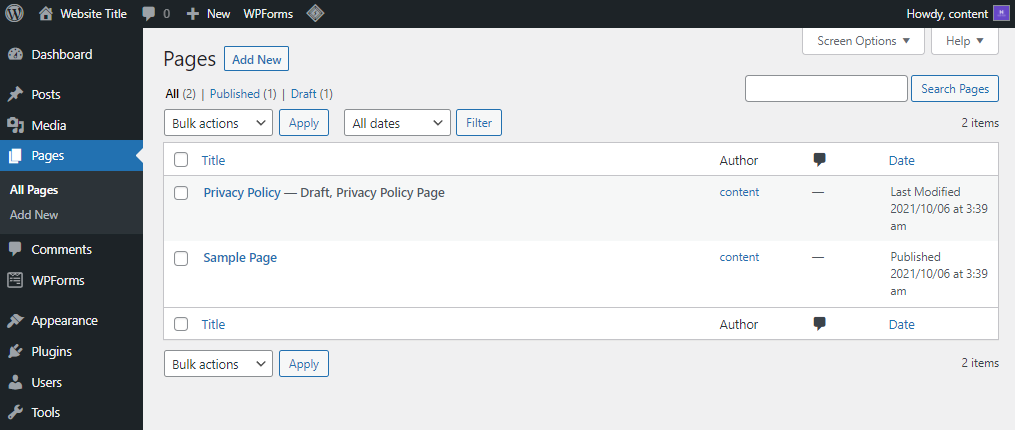
To begin building your first page on a new website, navigate to Dashboard → Pages → Add New. This will provide a user-friendly interface to create and customize your web pages according to your specific requirements.
When creating website pages, it is crucial to prioritize informative and accurate content, ensuring it is complemented by user-friendly navigation. WordPress offers built-in blocks that assist in structuring and enhancing the content and layout of your pages. To access these blocks, click on the + icon in the top left corner of the WordPress editor. This will open up a range of block options that you can browse through and select from to optimize your page.

With a blog page, there is no need to include anything on the page.
When setting up a blog page in WordPress, there is no need to add any content to the page itself. Instead, you can configure the blog page settings by navigating to Settings → Readings. In the “Your homepage displays” section, choose “A static page.” Then, select the empty blog page from the dropdown menu in the “Post page” section. Finally, click on “Save Changes” to apply the settings. Whenever you create and publish new blog posts, WordPress will automatically display them on the designated blog page.

Furthermore, WordPress provides page builder plugins that offer enhanced flexibility in customizing web pages. Popular page builders like Elementor, Beaver Builder, and WPBakery Page Builder offer intuitive drag-and-drop interfaces, ready-made designs, and content resizing options.
The advantages of utilizing page builders are numerous:
- User-friendly: Users without coding knowledge can effortlessly create interactive and visually appealing web pages.
- Efficiency: By utilizing pre-designed sections and templates, users can quickly generate various types of pages, eliminating the need to start from scratch each time.
- Enhanced functionality: Page builders enable the addition of advanced features, elevating both the functionality and design of web pages.
It’s important to note that certain page builder plugins may be better suited for specific types of websites, so it’s recommended to choose one that aligns with your website’s requirements and objectives.
Warning!
It is crucial to use only one-page builder at a time. Attempting to utilize multiple page builders concurrently can result in errors and hinder the performance of your website.
5. Create a Navigation Menu and Widgets
When constructing a website, it is essential to prioritize the user experience when accessing different pages. To enhance the navigation on your WordPress website, it is crucial to optimize menus and widgets.
Begin by creating a menu that facilitates visitors in navigating between pages seamlessly. Maintaining consistency by displaying the same menu across all pages is recommended. Alternatively, you can create separate menus for specific locations or sections.
Follow the steps outlined below to create a menu:
- Navigate to your WordPress Dashboard and go to Appearance → Menus.
- Assign a descriptive name to your menu in the designated field.
- In the Menu Settings, choose whether you want new pages to be added automatically to the menu.
- Select the appropriate display location for your menu on the website.
- Click on the “Create Menu” button to finalize the creation process.
You can then add Pages, Posts, or Categories to your menu by selecting them from the available options. Once you have made the desired selections, click “Save Menu” to apply the changes successfully.

Furthermore, consider installing the following WordPress menu plugins to optimize the design and navigation:
Additionally, you may want to explore the following WordPress menu plugins to enhance the design and navigation of your website:
- Max Mega Menu: This plugin offers a quick and responsive menu solution, making it effortless for users to navigate between pages.
- Responsive Menu: With over 150 customization options, this plugin provides a beginner-friendly and lightweight interface. It lets you personalize your menu to suit your website’s unique style and requirements.
- WP Mobile Menu: Designed specifically for mobile devices, this plugin optimizes your website’s menu for smaller screens. It ensures mobile users a fast, simple, and responsive menu experience.
In addition to creating user-friendly menus, your visitors’ experience can be enhanced by customizing WordPress widgets. Widgets allow you to incorporate additional content and structure into various sections of your website, such as the header, footer, and sidebar. Popular widgets include recent posts, calendars, and search bars.
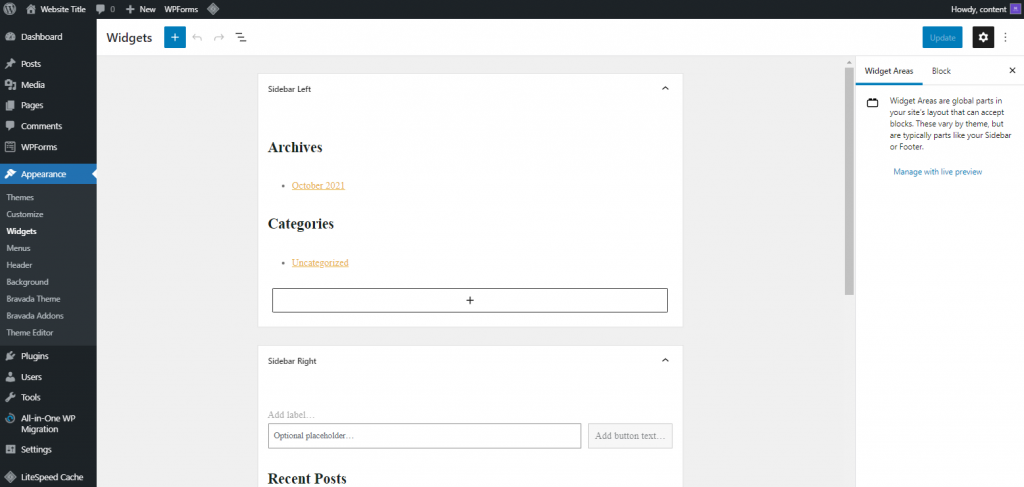
While some themes come with predefined widget areas, you also have the flexibility to create your own custom widgets. To do this, navigate to Appearance → Widgets. From there, you can utilize blocks by clicking on the “+” icon to add and customize content within your widgets. This allows you to personalize the layout and functionality of your website to meet your specific needs.
To customize widgets directly within your web design, follow these steps:
- Go to Dashboard → Appearance → Customize.
- From the Customize menu, choose Widgets to access the various areas where you can add widgets, such as Sidebar Right, Footer, Header, and Side Section.

- Rearrange the widgets by dragging and dropping the blocks or clicking the “+” icon to add additional blocks. Your changes will be displayed in real-time.

- Once you are satisfied with your customization, click on the Publish button to save the changes. Alternatively, you can click on the gear icon next to it to Save Draft if you want to continue editing at a later time.
6. Optimize Your Website for SEO and Conversions
To enhance the search engine optimization (SEO) of your WordPress website and improve its ranking on Search Engine Result Pages (SERPs), utilizing SEO plugins is highly recommended.
These plugins offer valuable features and functionalities to optimize your site effectively. Here are some top SEO plugins for WordPress:
- Yoast SEO: This plugin automates technical SEO improvements and provides advanced XML sitemaps, helping you optimize your site for search engines. For detailed instructions, refer to our guide on utilizing Yoast SEO on your WordPress site.
- Google XML Sitemaps: This plugin generates comprehensive XML sitemaps for your website, making it easier for search engines to crawl and index your web pages efficiently.
- Broken Link Checker: By preventing search engines from detecting broken links on your site, this plugin maintains a consistent SEO performance while enhancing user experience.
- W3 Total Cache: This plugin significantly improves site speed by reducing download time, resulting in a faster and more responsive website.
In addition, SEO plays a crucial role in boosting brand awareness. For business websites, particularly in the technology sector, organic searches can generate significantly higher revenue. SEO can contribute to increased conversion rates by improving key factors such as:
- Site speed: Ensuring that your website loads quickly is essential, as the ideal loading time is generally under two seconds. A fast-loading site encourages visitors to explore multiple pages and reduces the risk of them leaving due to slow loading times.
- Image optimization: By optimizing images and graphics on your website, you can enhance the visual appeal for visitors. Optimized images not only improve the overall aesthetics of your site but also contribute to faster loading times.
- Mobile responsiveness: Optimizing your website for mobile responsiveness is crucial with the increasing use of mobile devices and touch screens. A mobile-friendly website ensures seamless performance across various devices, enabling visitors to access your site quickly and navigate it effortlessly.
7. Add More Functionality to Your Website
WordPress offers numerous possibilities for scaling your website, allowing small business websites to grow into expansive eCommerce stores and beyond.
To enhance functionality and expand your WordPress website, consider incorporating the following features:
- eCommerce plugins: Transform your site into a fully functional online store with secure payment gateways and user-friendly product pages. WooCommerce is a highly regarded WordPress eCommerce plugin that simplifies the process of creating an eCommerce website, offering a range of customizable options.
- Booking plugins: Booking plugins are essential if your business involves reservations, such as a hotel or restaurant. These plugins enable customers to check availability, make reservations, and even process online payments seamlessly.
- Contact form plugins: Stay connected with your website visitors by providing a simple and convenient way for them to contact you. Contact form plugins facilitate communication and help prevent spam by eliminating the need to publicly display your email address.
- Mobile responsiveness: With mobile devices accounting for a significant portion of global website traffic (54.8%), ensuring your website is mobile-friendly is crucial. Optimize your site for mobile devices to reach a wider audience and gain a competitive edge in today’s mobile-centric world.
In addition to incorporating additional features, it is crucial to ensure that your server is suitable for the type of website you are building. When scaling your WordPress site to a different level, consider the following aspects:
- Storage: As you add more files, pages, and tools to your website, it is essential to increase your storage capacity. This prevents slower loading times and ensures optimal performance. Fast loading speed remains a critical factor for a successful website.
- Quality: When expanding your website and adding more content, it is crucial to maintain consistent quality across all pages and files. Take the time to review and update older content to ensure its relevance and adherence to your website’s overall standards.
- Security: Scaling your website often involves increased interaction with visitors and potentially handling sensitive data. Therefore, it is vital to prioritize the safety of your WordPress site. Implement robust WordPress security features and regularly update them to protect your website and the data of your visitors.
8. Launch Your Website
Before launching your website, it is crucial to thoroughly test it for any potential issues that could impact the user experience and overall usability. Here are various methods to test your website before making it live:
- Seek feedback from family and friends: Request individuals you know to visit your website and provide input from a visitor’s perspective. Respond to their comments regarding the design, navigation, features, and mobile responsiveness. Their insights can help you identify any areas that may require improvement.
- Conduct A/B testing: Utilize tools such as Google Optimize or Nelio AB testing to compare two versions of your website. This method allows you to gather data-driven insights on which version performs better regarding user engagement and conversion rates. You can make informed decisions to optimize your website’s effectiveness by testing different variations.
- Perform speed tests: Website speed is crucial in attracting and retaining visitors. Utilize tools designed to assess the speed and performance of your website. These tests can identify potential bottlenecks and suggest optimizations to enhance loading times and overall performance.
Your Website Is Now Online – What’s Next?
Building a website offers numerous personal or professional branding benefits and enables sharing content with a broader audience. Before creating your own website, selecting the right platform, choosing a memorable domain name, and acquiring a web hosting plan, if necessary, is essential.
Our focus has been on two platforms: content management systems (CMSs) and website builders. We have provided step-by-step instructions for creating a website using WordPress and Hostinger, along with valuable tips for optimizing your site.
Once your website is successfully launched, there are several post-launch tips to consider:
- Regularly revise your content: Stay up to date with the ever-changing best practices in SEO and revise your content accordingly. This ensures that your website remains relevant and optimized for search engines.
- Promote your website: Utilize various marketing strategies such as content marketing, email marketing, social media promotion, and affiliate marketing to effectively promote your website and attract a larger audience.
- Analyze performance: Regularly evaluate your website’s performance to identify any areas for improvement. Utilize tools like Google Analytics to gain insights into visitor behavior, traffic sources, and other key metrics. This data can help refine your marketing strategies and address potential issues.
To further enhance your understanding of website building, we recommend exploring the recommended readings and FAQs, which provide valuable insights and answers to common queries.
FAQs of Create a Website with WordPress
Can I Create a Website Without Technical Knowledge?
Absolutely! Many platforms are designed to simplify website building, eliminating the need for coding knowledge. Website builders, for instance, offer user-friendly interfaces and drag-and-drop features to customize high-quality designs easily.
Is Coding Required to Build a Website from Scratch?
Building a website from scratch involves tasks such as acquiring web hosting and a domain name. Then, you can create HTML and CSS documents using frameworks like Bootstrap. However, coding a website from scratch could be more beginner-friendly and require familiarity with web development trends and best practices.
Can you Create a Website for Free?
Several website builders offer free subdomains, such as “www.website.mainsite.com.” These subdomains are suitable for beginners who want to explore website creation without cost. Keep in mind that free subdomains may have limitations.
How Much Does It Cost to Create a Website?
The cost of creating a website varies depending on its complexity and the chosen approach. Hiring a web developer can range from $100 to several thousand dollars per year. It’s important to align your budget with the type of website you intend to create.
How Do I Create a Business Website?
Creating a business website follows a similar process to creating any other website. However, additional elements include product or service pages, contact pages, and an about page. A business website helps expand your customer base, increase revenue, and improve business operations.
How Do Website Owners Generate Income?
Website owners can monetize their sites by displaying advertisements in the sidebar, footer, and header sections. Google AdSense, for example, offers a pay-per-click tool for site monetization. Sponsored content can generate income, mainly if your website attracts high traffic.
How Long Does It Take to Create a Website?
The time required to create a website depends on the chosen platform and the complexity of the website. Users can create a basic site within minutes with confident website builders, particularly AI-powered builders. However, platforms with steeper learning curves may take weeks to build a high-quality website.
Can I Switch from Hostinger Website Builder to WordPress?
If you wish to migrate your website from Hostinger Website Builder to WordPress, delete the site created with the builder to release your domain name. Afterward, you can connect your domain to a WordPress site.
How Many Products Can I Sell with Hostinger Website Builder?
With Hostinger Website Builder, you can sell up to 500 products. This allows you to set up a small to medium-sized online store for your business.
Conclusion
In summary, creating a website with WordPress is an accessible and empowering journey, even for beginners. With the step-by-step guide, you can confidently choose a domain, obtain web hosting, install WordPress, and customize your site to meet your needs.
WordPress offers a user-friendly platform that allows you to build a professional website without coding expertise. Whether you’re an individual or a business, WordPress provides the tools and flexibility to achieve your goals.
Optimize your site for search engines, enhance user experience with plugins and widgets, and regularly update your content. With abundant resources available, you can continuously learn and grow.
Embrace WordPress’s possibilities and create a powerful website to share ideas, showcase your brand, and connect with a global audience. Follow this guide to create an excellent website that makes a lasting impression.
Don’t hesitate—to start your WordPress website-building adventure today and unlock the online world’s boundless potential.
For More amazing articles related to Web Hosting Guides Check out our website Over Here
To Read more similar articles click here
Thanks for visiting our Website. If you appreciate our work, kindly show us some support in our comments section 🙂